


Building The Frame for Your Cloche
We begin our project by building a simple wood frame out of our 2 X 2 X 8 Ft. Lumber. These 2 X 2's can be gotten by ripping down the middle of a 2 X 4 or just purchase them outright from your Lumber Store.

Assembling the Frame
Find a flat surface like a driveway and using the Screwdriver and 4 large 3 inch deck screws, screw the 4 - 2 X 2 Frame pieces together as shown in the previous Diagram. Be sure to screw the two long pieces to the short pieces as shown in the diagram. Otherwise you may have trouble setting your cloche on your 4 X 8 ft plot. Of course, you can reconfigure the 2 X 2's any way you wish if your plots are of different outside dimensions than mine.
Attach Corner Braces

Using a framing square, try to keep the Frame Assembly as square as you can. Begin attaching the 4 corner Braces. Attach the Braces to each corner as shown in the photos Below. For extra strength in the joint, I also apply waterproof glue along with each brace before screwing them down. Leave the last brace loose from one screw temporarily as you use a tape measure the square-up the whole assembly - then set the last screw to hold everything in the squared-up position. You don't have to be hair-line close with your squaring but you do need to be "close" Your braces should be cut at a 45 Degree angle on each end and the screws centered with both the 2 x 2 lengths and the Braces themselves. Note: At this point. Ignore the pegs you see. They will be added at the end of the construction of the Cloche/Hoop-House Frame and are used to hold the Cloche/Hoop-House Plastic Pipe Ribs.

Squaring on the Diagonal
This method of squaring up is used for anywhere from Picture Frames to Concrete Forms, to laying out a City Lot. When the diagonals are equal lengths from corner to corner, the area is a perfect square. If you come withing a quarter inch of them being equal on your Frame, your probably OK. Any slight curves in your boards will throw these measurements off. This is just to check to make sure you are not radically off square.

This diagonal measurement is about 109-1/2 inches .

The opposite diagonal is about 108 - 5/8 inches.
We have a difference of 7/8 inch. Stand the frame on it's side and apply pressure on one corner to force the frame slightly to move sideways. Check the diagonals. If they are withing 1/4 inch or less, Your probably close enough. Fasten the last Brace down. However, If you set this on your Raised Bed, and it's drastically out of whack, you will have to loosen one or two of the braces and "wedge" it more into square and reattach the braces. With this, you are finished with the Frame. Note: For extra strength, you might attach iron "L" brackets to each corner. These are also available at any Hardware or Big Box Build-It-Yourself store. I found that they add extra weight and cost and probably aren't necessary in the long run.
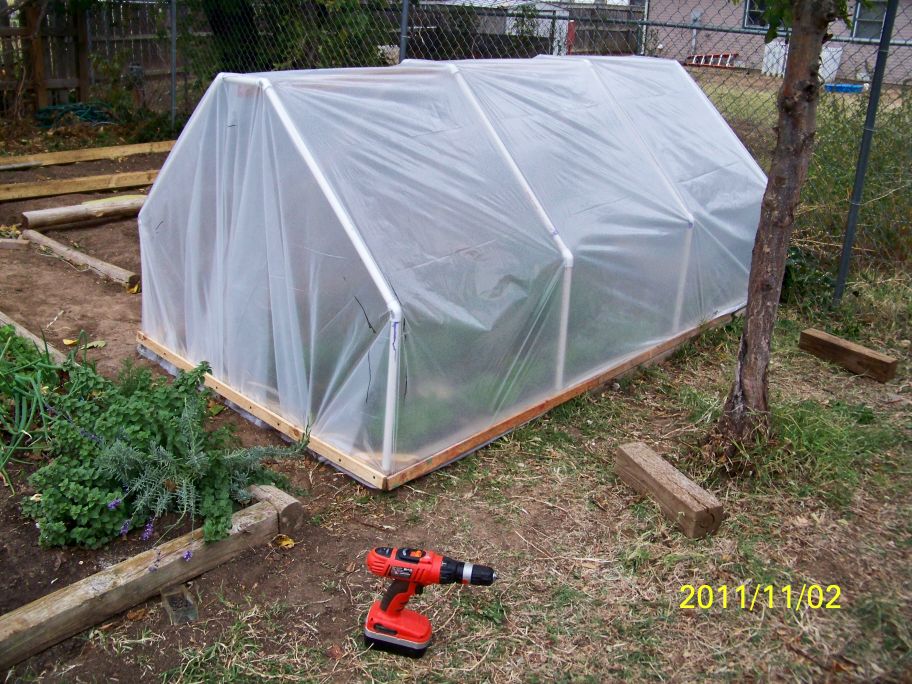
At this point, we will lay the Frame aside and make our Pipe Ribs that will provide the roof and sides of your Cloche/Hoop-House and hold your plastic covering in place. Later, we will be installing the Dowel anchors in the Frame to hold the Pipe Ribs (or "Hoops" as you may wish to call them).
Making the Pipe Ribs
From the 10 Ft Plastic Pipe you will need to cut these pieces.
8 - 18 inch pieces
8 - 30 inch pieces
4 - 8-3/4 inch pieces
While a Table Saw makes quick work of cutting these pieces, use this saw - Only if Your Experienced With this Saw. Same with the new powered Miter Saws. Neither one is for Amateurs. Instead, use a hand powered Back Saw and Miter box. Or just use an old fashioned hacksaw and cut your pieces of as square as possible.
After the pieces are cut, Use a grinder to make a square and slightly rounded end. Smooth with regular sandpaper and wipe clean of any dust. The steps for preparing to glue the pieces together are shown here. Follow these steps carefully, and you will not have any trouble gluing the Pipe Ribs together.
No. 1

No. 2

No. 3

Sand the Ends Smooth - It only takes a few seconds.
Any grit from 60 to 120 should work fine.
How to Glue Pipes Together
This is probably the trickiest part of the whole crafting of this project. If you have done it before, it is a piece of cake! If you haven't then it is easy to learn. You might get some of the scrap pipe after cutting and purchase a few extra joints just for practice. Here are the steps that must be followed and in this sequence to make a good, solid, dependable pvc pipe joint. And good Pipe Ribs for your Cloche/Hoophouse:1. Have all your pipes, joints in easy reach.
2. Open both the Pipe Glue and the Purple Pipe Compound. Leave the caps on loosely.
3. After applying the glue and inserting the pipe into the coupling, hold in and at the same time,
give the joint or pipe a quarter turn to help bond them together.
4. When putting the pipe piece and joint together, HOLD in for about 10 seconds. The
reaction of the glue bonding with the pipe and joint will try to force the pipe and joints apart.
After the few seconds, you are then free to let go.
5. When joining two pipes together, sight down the pipes to make sure everything is aligned straight.
You don't want one pipe going "South" from the other. Glue, Insert, Twist and Sight in to place and
Hold for the required time. Sight along the length of the two or more joined pipes. They should all
line-up. You only have a few seconds to do these steps. After that there is no fixing the joint if you a
don't have them properly glued and aligned. That's why you leave the caps loose on the glue and
purple compound. You don't have time to screw the lid on one after using it and unscrewing the
other. Close the lids when your finished!
No. 1

When you are ready to start assembling a Pipe Rib,
Be sure to loosen the lids of the Glue and Purple
Primer. Tighten when your finished.
No. 2

No. 3

Coat it well. Messy is OK - Probable!
No. 4

Don't forget to coat the inside of the Coupling as well!
No. 5

Next coat the Pipe with Glue right on top of the Primer.
No. 6

Quickly apply Glue to the already Primed Coupling.
No. 7
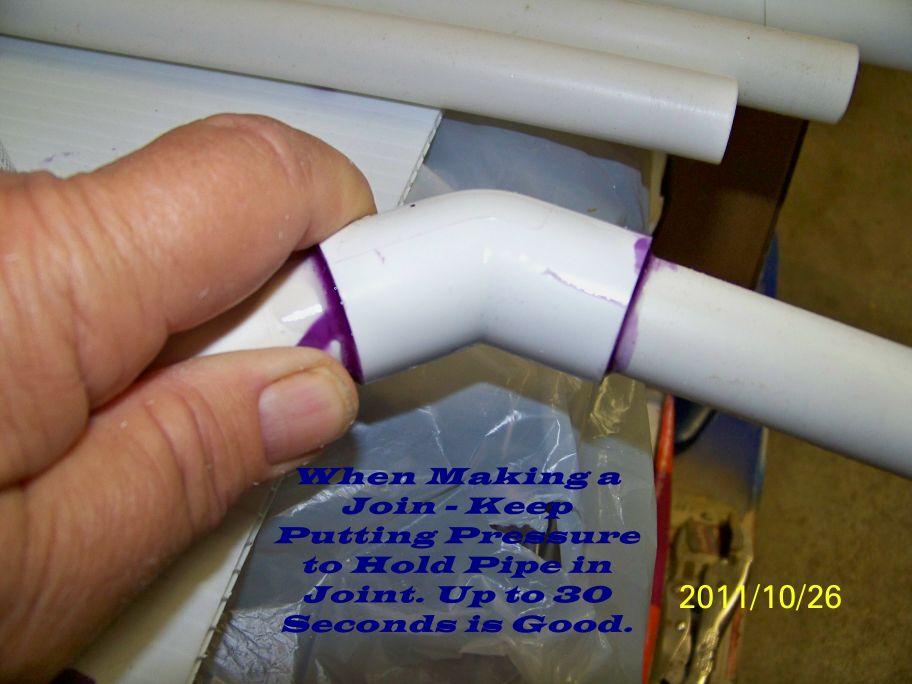
Push the Pipe into the Coupling, Twist 1/4 turn, Hold
Pipe into Coupling while Twisting. Quickly Alignment with the
other Pipe if you have one already joined on the other
end of the Coupling.
No. 8 -Not This!

If your joint looks like this, you will most
likely have to make a new Rib. There is no
redoing after a few seconds of misalignment.
No. 9 - Look at this!

Slight Misalignment of Ribs is OK. You
can see it by the "V" space while looking
down the 3 joined pipes.
No. 10.

No. 11.

Each Finished Rib has two "sub-assemblies".
Carefully Join these two together to make one
Pipe Rib. You should end up with 4 finished
Pipe Ribs for your Cloche/Hoop-House.
No. 12

This show a finished Pipe Rib. If you pre-assemble before
Gluing, You can align all the pipes and joints perfectly, then
Mark across the joint and pipe with a marker just before you Prime and Glue.
All you have to do is Glue, Push the Pipe in. Align and Hold the pipe/joint Marks
for a few seconds. Wa-La. A perfect Rib!
Here is a Diagram of a Complete Rib Assembly

Links to Article Sections
No comments:
Post a Comment