Wednesday, December 28, 2011

How to Make a Miniature Kitchen Table Greenhouse

How to Make a Miniature Kitchen Table Greenhouse 

Here it is, the depth of winter  and I'm caught with Stevia plants that I need to keep alive till Spring when I can set them out safely. At the end of last fall, after harvesting the only Stevia plant I had - which is an annual in the Midwest U.S.;  all I could do was save some of the more viable stems and try to root them. My success rate was about 40%.  So.  Now what? How can I keep them alive till Spring without spending a lot of money on a heated greenhouse? I decide to build a miniature greenhouse that could be set in any room and keep my plants alive till Spring.


 I needed something small, easy, and fast to protect my new Stevia starts until I could come up with something better. I took my little potted starts and put them in an ordinary rectangle cake pan. Shoved them into a semi-clear plastic grocery bag, And put them under a goose neck desk lamp with one of those fancy new corkscrew fluorescent lights. They give off good plant light but little or no heat. The light was the Equivalent of a 100 watt light source but uses about 27 watts of electricity. This kept my plants pretty snug until I could come up with something better. I then planned out and built this tiny greenhouse. The size of a Cake Pan. The plants go in the pan, and the little greenhouse just sets over it. That's it. Keep the lights on about 12 to 16 hours a day and water when necessary.
Your new babies should thrive. Oh. Keep in a warm room.  Normal temperature for humans is great. Take the plants out on occasion and mist them if the seem to be too dry. They can be damp in the soil and still be hurt by dry air in a home especially with gas heating. 


    MATERIAL:

  • A Sheet of fairly Clear Plastic - About 3 Ft x 4 Ft. This can be gotten from a $1 Painting sheet at the Dollar Store or Storm window material at the hardware store, or (more expensive ) rolls of plastic at 2, 4, 6 mil thickness in rolls at the Big Box store or local hardware store.

  • About 20 Sturdy Thumbtacks or Carpet Tacks

  • 5 ft of 1x2 or 1 x3 fairly Clear Lumber.(I used cabinet grade plywood strips because that is what I had handy.)

  • Standard Size Rectangle Cake Pan. 

  • 10 ft. of Heavy Wire - #9 or approx. 1/8 inch thickness. Aluminum is easy to bend but more expensive than regular wire for farm use etc. Sometimes called clothesline wire but must be stiff,  not braided plastic covered type.

  • 1" Wire Brads (small headless nails )

  • Waterproof Wood Glue ( I use Titebond III (R).

TOOLS
  • Hand Saw to cut the wood strips to length

  • Hand Power Drill  to drill holes to hold wire hoops in wood strips and Drill Bit slightly larger than wire thickness. Wire should fit snug in the hole. Not tight or loose.

  • Tape Measure

  • Scissors to trim plastic to size
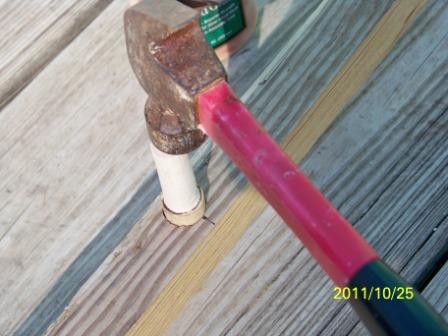
  • Small Hammer

  • Wire Cutter (or Hack Saw) to make a nice clean square cut.

  • Drawing Compass A $1 cheap Dollar Store School Compass will work fine. A pencil is usually provided.

First cut the wood strips. Measure  the length and width of the cake pan at the widest parts (Top edges) and add about 1/4 inch to the length and width of the pieces so the pan will easily slide in and out of the wood frame. 

 I used thinner wood strips on the ends because I didn't need the thickness to support wire hoops. It helped make the whole thing a little lighter. First glue the ends. Then hammer in about 3 brads. Also try to keep the frame squared up as possible.  Make 2 diagonal measurements from one end to the other and then from the opposite corners (diagonally again.) The two measurements should be within a 16th of an inch or so and the frame will be square. If not, check for accurate measurements  on the strip lengths. 

Next, Drill two wire hoop holes on each end straight across from each other. Then two evenly spaced holes on each side evenly spaced and across from each other. Try to keep the holes straight up and down in the wood and centered.


How to Make the Hoops

Once the wood frame is finished. It is time to make a Template to measure off your wire and to shape it to make 4  nice hoops. Measure across from one hole in the frame to the opposite hole. This is the measurement that will give you the diameter of a circle. 

Draw out the Circle on a board or heavy cardboard or your wife's kitchen table...lightly so you can erase it before she catches you!


Cut the circle in half. This is the curve of your hoop. Draw down from the ends of the half circle a straight line on each side. The straight lengths should be around 7 inches or so long. Measure the total length around the template. Start from one straight end and continue up around the curve and down the other side. This gives you the length of wire to cut.


Cut 4 wire lengths to this measurement. They should be somewhere around 29 or 30 inches.


Bend the wires to match the Template. You now have 4 nice hoops.


Insert the wire hoops into the wood frame. They should fit snug but not tight so you can push them into the holes without bending the wire. I have used a piece of tape to indicate on the wire when it is completely in the hole. All wires should inset to the same length. From at least 1" to the full length of the height of the frame. The longer the better but also the harder to get in. 


When all the wires are installed in the wood frame. Lay the plastic cover over the hoops and even out on the ends and the sides. Snug up the plastic cover, Thumbtack to the bottom of the frame. Trim off the extra. You may now set the little greenhouse frame over the cake pan full of little plants. Set a light over them and you are fixed to go! I find that a  desk lamp at each end gives plenty of light for starting new seedlings, cuttings, etc.
Copyright 2012 Robert Mader
All Rights Reserved

For any additional questions, just e-mail me at 
RobertLee97@Gmail.Com


Sunday, December 25, 2011

Laying on the Hoop-House/Cloche Cover 9 of 9

Laying on the Cover
At this point you are ready to lay on the plastic and securing it down. But first detach the upper section of each hinge from the Cloche Frame. Do Not detach the lower section of the Hinges from the Raised Bed. this will allow you to attach the plastic to the Frame. Close the hinges over the plastic. And screw the top of the hinges to the frame again going through the plastic. 

Notice that there are 4 thin batten board strips cut to length to fit
between the Hinges in the middle and one for each end. These will be 
used later to secure the plastic in place after it is pulled into place. 

The copper nails are used to quickly tack the plastic to the frame.

Start by pulling the plastic into place. Be sure you have extra plastic on each end. A good way to temporarily hold the plastic from blowing or slipping askew is to use a few large plastic clips found at most hardware and big box stores. They kind of resemble giant plastic clothes pins. Or just have a few friends hold the plastic in place.  Start on the hinged side. leave a few inches extra hanging  and tack every foot or so with a brass nail. Go to the other side, pull the plastic snug but not tight and tack down with brass nails along the full length also.

Procede to each end and tack down leaving a few inches to roll under a couple times before permanently screwing down the batten strips.  

Start the small 1" Dry Wall Screws into the Batten
Boards before screwing them over the rolled plastic ends.


Install the Battons over the tacked down plastic
all the way around the Cloche. 

Trim off the extra plastic. Attach a handle to the open
side of the cloche. Inexpensive metal handles may be
purchased at the Hardware Store. Your finished! 

If you have any questions about building this Cloche, Contact me.
RobertLee97@gmail.com


Copyright Robert Mader 2012
All Rights Reserved


How to Make a Cloche/Hoop-House - Part 7 of 9

Setting the Hinges
The hinges are actually the fasteners that attach the Cloche Wooden Frame to the Raised Bed Frame. You must first attach the blocks - one on top of the other - but not connected. Use the edge of the Frame to give you a level, straight,  line to screw the top 3 blocks to. After attaching these, attach the bottom blocks to the Raised Bed Timbers or Boards directly under the top row of blocks. You will then center the 3 hinges over the 3 sets of blocks and screw them to each block. Be sure they are also In Line with the blocks. Otherwise, the blocks and hinges may bind and not allow the Cloche to hinge open.


Contrary to the Photo, The size of the hinges have been increased from 1-1/2
inches to 3 inches long. The Center Hinge is still in the Center and the 2 Outer
Hinges have been set closer to the ends for better stability. The Stakes, string and Timbers 
to the Left of the picture are part of  another GrandBob's Garden Projects. How to Build 
Raised Beds   from Inexpensive Landscape Timbers. These will be Beds # 4 and #5  for me and are 
the ideal solution to bad soil - clay soil conditions - once and for all! I try to add one or two each year.
The rest of my garden grows (thank you very much) in Small or Large Boxes and set on the Grass!


Here is a Close-Up view of 2 sets of Hinges and Wood Brackets. Notice One half of the bracket
is attached to the Frame. The other half is attached to the Raised Bed Timber. The Hinges themselves Join
the two halves of each Bracket  and allow the whole assembly to open and close easily and help stabilize. 
Also notice how the Wooden Brackets bridge the gap between the dissimilar Timber and Frame side pieces and allow one to install the Hinges on flush mountings. 

.
Copyright Robert Mader 2012
All Rights Reserved

How to Make a Cloche/Hoop-House Part 6 of 9

More on Installing the Dowel Anchor Pegs into the Frame

Wow! We're almost done with the fabrication of the Choche/Hoop-House. The last step except for setting the frame on the Raised Bed and Covering it is to Set the Dowel Anchors.
You first need to cut for evenly space holes in the sides and ends 
of the Cloche Frame. One hole for each end and two spaced equally along the sides. The hole in this case uses a 7/8 inch wide bit to accommodate a 7/8 inch Dowel end. 

If the hole is slightly to large, use toothpicks to wedge the glued Dowel Anchors in tight. They will set in permanently. If the hole is slightly too small, sand or rasp the down down to fit in snugly. I drive mine in with a hammer. However, if they are too tight, you could split your 2 X 2.  You don't want that! And don't forget the Waterproof Glue. Both in the hole and around the peg end.

Don't put Glue on the Pipe End. This allows you to remove the Ribs and to break down the Cloche/Hoop-House for storage later on if you so wish. Or to facilitate moving it to a different bed.


 Here you can clearly see how the 1-1/2
inch Peg end of the Cloche Anchor fits
 into the Frame. Be sure to apply glue to
Both the Peg and the Frame Hole it goes in. 
Do not Force the peg in. Sand or Rasp down
if it fits to tight in the hole.

This is another view of a plug securely installed.

Here you can make out how the 8 pegs are laid out.
4 on the ends, and 4 equally spaced on each side. Try 
to match up the pegs on opposite sides as close as
you can. Slight warps in the lumber should not cause 
any big problems. When you have all the Dowel Anchor pegs installed, 
Just slip the 4 finished Rib assemblies onto the protruding Pegs. You could put small screws
 through the pipes and into the pegs but I haven't fount that to be necessary. The cover will 
hold them on anyway. My Cloche has easily withstood 65mph + winds already when closed. 
Without latching or tying down the cover or screwing the frame to the Raised Bed . The Cloche
 is attached to the Raised Bed with just the 3 Hinges that we will soon be installing. 

Slip the Pipe Rib Assemblies on to the Pegs 

The Ribs have been installed. It is now time to set the frame on the Raised Bed. 
You might want to remove the Rib Pipes temporarily to facilitate moving the frame.
I have found that the pipes do not have to be fastened any further to the frame than
setting them over the pegs. That is why snug accurate fit is important. The soon to be attached
covering will also keep the pipes from pulling out.


Here we have attached the single 2 x 2 x 8 Ft
"Spine" to the Cloche Ribs at the top. I just set a screw
down through each pipe in the center of the small pipe, and down 
into the spine. You Might enlist a friend to help you with this. Or 
Just wire it up temporarily until all the screws are in. I fashioned
a little Jig to help hold the screws until they are set. Here you will also 
notice how the Hinges are attached on the prevailing wind side. (North
for Winter in this case. 

Here is the simple jig I fashioned out of a scrap block of wood. 
I first drilled a hole the same size at the outside of the pipe. Then I punched a hole in the block to guide a Bit.
when I set the block astraddle the very center of the rib (very top) The block was then cut down the middle of the Pipe hole and one of the halves discarded. The jig sets on top of the pipe to guide a small bit down
 through the pipe and into the  Backbone piece. Then a screw is dropped
 in and easily fastens the wooden Backbone  to each Rib.The screw hole should be slightly smaller than the screw you are using. Use a practice piece to check that out. To small the screw will split the pipe. Not good.
To large, the pipe will separate from the center spine that you are screwing into.


A better view. Notice how the spine is centered through each Rib 
and attached with a single 1-3/4 inch  drywall screw. And yes, the front is slightly off center. 
I will have to fix that some day.... That's what I get for "eye-balling" when I'm tired!  This is where I 
finished up for the day and went in for clean-up and Dinner.  I finished up the next day.  I was bushed!

 This shows how the Cloche Frame sets on top of the Raised Bed Timbers.


Copyright Robert Mader 2012
All rights Reserved


How to Build a Cloche/Hoop-House - Part 5 of 9


Making the Dowel Anchors


After Measuring of the pipe side of the dowel, Sand or
rasp carefully until it fits into the correct size pipe But
not too snugly. It should pull out easily but no wobble.


Cut the Dowel anchor off of the stock piece of dowel.
Smooth down the rough edges and round the Frame end
slightly at the edges to help ease it in. This will be glued
into the frame hole permanently with waterproof wood Glue.


Glue and drive the peg into the frame using small taps of the
hammer. It should fit snug but not so snug as to break the
peg or split it.

Another view


The Finished Frame Assembly with all 8 Dowel Pipe Anchors Installed


How to Build a Cloche/Hoop-House - Part 4 of 9


Making Dowel Anchors for Cloche Ribs
This part is not as tricky as making the Pipe Ribs for you 
Cloche/Hoop-House. This is the procedure. Start on one end of the Dowel and shape the 2-1/2 end to just fit the pipe you are using. Usually the Dowel will be slightly to big. It needs to be taken down a fraction to fit. This can be quickly done with a Table Saw. Use this method only if your Experienced. The pictures shown here are taken without the Guard for photography purposes. Always us the Blade Guard. Spinning Blades are extremely dangerous without safety guards and practices!


Otherwise, You can shape the pipe ends with a Hand Wood Rasp. After shaping the pipe end,  measure up another 2 inches and Cut the Dowel Anchor off.  Procede to the next Anchor. You will need 8 total Anchors. Here is what the fabrication process of your Anchors looks like:


Dowel Anchor Diagram
No. 1 Photo
This is one way to cut down the
Pipe End of the Dowel Anchor. Or you
could just use a hand wood rasp to work
it down to fit inside the pipe snug but not tight.

No. 2 Photo
No. 3 Photo


You should be able to pull the pipe from the Anchor
with just 2 hands easily. This is not a permanent connection.

Notice how the worked down end of the dowel slides easily 
into the Pipe. Check each finished dowel for pipe fit
 before gluing it into the Frame hole.

No. 3 Photo

Cut off the finished Dowel Anchor
and proceed to the next one. I am using a Saber 
saw here. A Jig saw etc. would also work. Or any
Hand Saw but it takes a little more work!

No. 4 Photo
[Or you Could use a Table Saw]
Another method for shaping the pipe end 
to Fit. The Blade barely touches the wood. The
dowel is gradually turned into the blade at a slight angle. 
Not Recommended for Amateurs. Always
use the Blade Guard on a Table Saw if you
use this method. The Guard is off to facilitate
the photographing of this method.


Saturday, December 24, 2011

Build a Cloche/Hoop-House - Part 3 of 9


Building The Frame for Your Cloche
We begin our project by building a simple wood frame out of our 2 X 2 X 8 Ft. Lumber. These 2 X 2's can be gotten by ripping down the middle of a 2 X 4 or just purchase them outright from your Lumber Store. 


Assembling the Frame
Find a flat surface like a driveway and using the Screwdriver  and 4 large 3 inch deck screws, screw the 4 - 2 X 2 Frame pieces together as shown in the previous Diagram.  Be sure to screw the two long pieces to the short pieces as shown in the diagram. Otherwise you may have trouble setting your cloche on your 4 X 8 ft plot. Of course, you can reconfigure the 2 X 2's any way you wish if your plots are of different outside dimensions than mine. 
 Attach Corner Braces


Using a framing square, try to keep the Frame Assembly as square as you can. Begin attaching the 4 corner Braces. Attach the Braces to each corner as shown in the photos Below. For extra strength in the joint, I also apply waterproof glue along with each brace before screwing them down.  Leave the last brace loose from one screw temporarily as you use a tape measure the square-up the whole assembly - then set the last screw to hold everything in the squared-up position. You don't have to be hair-line close with your squaring but you do need to be "close" Your braces should be cut at a 45 Degree angle on each end and the screws centered with both the 2 x 2 lengths and the Braces themselves. Note: At this point. Ignore the pegs you see. They will be added at the end of the construction of the Cloche/Hoop-House Frame and are used to hold the Cloche/Hoop-House Plastic Pipe Ribs.


Squaring on the Diagonal
This method of squaring up is used for anywhere from Picture Frames to Concrete Forms, to laying out a City Lot. When the diagonals are equal lengths from corner to corner, the area is a perfect square. If you come withing a quarter inch of them being equal on your Frame, your probably OK. Any slight curves in your boards  will throw these measurements off. This is just to check to make sure you are not radically off square.


This diagonal measurement is about 109-1/2 inches .


The opposite diagonal is about 108 - 5/8 inches.

We have a difference of 7/8 inch. Stand the frame on it's side and apply pressure on one corner to force the frame slightly to move sideways. Check the diagonals. If they are withing 1/4 inch or less, Your probably close enough. Fasten the last Brace down. However, If you set this on your Raised Bed, and it's drastically out of whack, you will have to loosen one or two of the braces and "wedge" it more into square and reattach the braces. With this, you are finished with the Frame. Note: For extra strength, you might attach  iron "L" brackets to each corner. These are also available at any Hardware or Big Box Build-It-Yourself store. I found that they add extra weight and cost and  probably aren't necessary in the long run. 

At this point, we will lay the Frame aside and make our Pipe Ribs that will provide  the roof and sides of your Cloche/Hoop-House and hold your plastic covering in place. Later, we will be installing the Dowel anchors in the Frame to hold the Pipe Ribs (or "Hoops" as you may wish to call them).

Making the Pipe Ribs


From the 10 Ft Plastic Pipe you will need to cut these pieces.

    8 - 18 inch pieces
    8 - 30 inch pieces
    4 - 8-3/4 inch pieces

While a Table Saw makes quick work of cutting these pieces, use this saw - Only if Your Experienced With this Saw. Same with the new powered Miter Saws. Neither one is for Amateurs. Instead, use a hand powered Back Saw and Miter box. Or just use an old fashioned hacksaw and cut your pieces of as square as possible. 

After the pieces are cut, Use a grinder to make a square and slightly rounded end. Smooth with regular sandpaper and wipe clean of any dust. The steps for preparing to glue the pieces together are shown here. Follow these steps carefully, and you will not have any trouble gluing the Pipe Ribs together.
No. 1


 No. 2


No. 3
 Sand the Ends Smooth - It only takes a few seconds.
 Any grit from 60 to 120 should work fine. 

How to Glue Pipes Together
 This is probably the trickiest part of the whole crafting of this project. If you have done it before, it is a piece of cake! If you haven't then it is easy to learn. You might get some of the scrap pipe after cutting and purchase a few extra joints just for practice. Here are the steps that must be followed and in this sequence to make a good, solid, dependable pvc pipe joint. And good Pipe Ribs for your Cloche/Hoophouse:

         1. Have all your pipes, joints in easy reach.
         2. Open both the Pipe Glue and the Purple Pipe Compound. Leave the caps on loosely.
         3. After applying the glue and inserting the pipe into the coupling, hold in and at the same time,
              give the joint or pipe  a quarter turn to help bond them together.
         4. When putting the pipe piece and joint together, HOLD in for about 10 seconds. The
              reaction of the glue bonding with the pipe and joint will try to force the pipe and joints apart.
              After the few seconds, you are then free to let go.

          5. When joining two pipes together, sight down the pipes to make sure everything is aligned straight.
              You don't want one pipe going "South" from the other. Glue, Insert, Twist and Sight in to place and                                      
               Hold for the required time. Sight along the length of the two or more joined pipes. They should all      
               line-up. You only have a few seconds to do these steps. After that there is no fixing the joint if you a
               don't have them properly glued and aligned. That's why you leave the caps loose on the glue and
               purple compound. You don't have time to screw the lid on one after using it and unscrewing the
               other. Close the lids when your finished!

No. 1
When you are ready to start assembling a Pipe Rib,
Be sure to loosen the lids of the Glue and Purple
Primer. Tighten when your finished. 

No. 2

No. 3
Coat it well. Messy is OK - Probable!

No. 4
Don't forget to coat the inside of the Coupling as well!

No. 5
Next coat the Pipe with Glue right on top of the Primer.

No. 6
Quickly apply Glue to the already Primed Coupling.

No. 7
Push the Pipe into the Coupling, Twist 1/4 turn, Hold 
Pipe into Coupling while Twisting.  Quickly  Alignment with the 
other Pipe if you have one already joined on the other
end of the Coupling.

No. 8 -Not This!
If your joint looks like this, you will most
likely have to make a new  Rib. There is no
redoing after a few seconds of misalignment.

No. 9 - Look at this!
Slight Misalignment of Ribs is OK. You 
can see it by the "V" space while looking 
down the 3 joined pipes.

No. 10.


No. 11.
Each Finished Rib has two "sub-assemblies".
Carefully Join these two together to make one
Pipe Rib. You should end up with 4 finished
Pipe Ribs for your Cloche/Hoop-House.

No. 12
This show a finished Pipe Rib. If you pre-assemble before 
Gluing, You can align all the pipes and joints perfectly, then 
Mark  across the joint and pipe with a marker just before you Prime and Glue.
All you have to do is Glue, Push the Pipe in. Align and Hold the pipe/joint Marks
for a few seconds. Wa-La. A perfect Rib!

Here is a Diagram of a Complete Rib Assembly