
More on Installing the Dowel Anchor Pegs into the Frame
Wow! We're almost done with the fabrication of the Choche/Hoop-House. The last step except for setting the frame on the Raised Bed and Covering it is to Set the Dowel Anchors.
You first need to cut for evenly space holes in the sides and ends
of the Cloche Frame. One hole for each end and two spaced equally along the sides. The hole in this case uses a 7/8 inch wide bit to accommodate a 7/8 inch Dowel end.
If the hole is slightly to large, use toothpicks to wedge the glued Dowel Anchors in tight. They will set in permanently. If the hole is slightly too small, sand or rasp the down down to fit in snugly. I drive mine in with a hammer. However, if they are too tight, you could split your 2 X 2. You don't want that! And don't forget the Waterproof Glue. Both in the hole and around the peg end.
Don't put Glue on the Pipe End. This allows you to remove the Ribs and to break down the Cloche/Hoop-House for storage later on if you so wish. Or to facilitate moving it to a different bed.
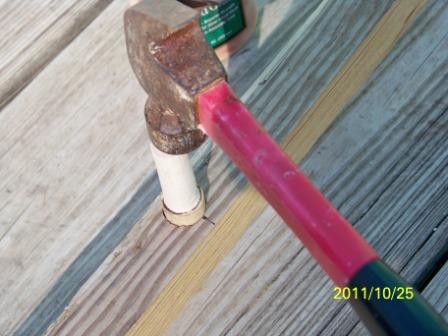
Here you can clearly see how the 1-1/2
inch Peg end of the Cloche Anchor fits
into the Frame. Be sure to apply glue to
Both the Peg and the Frame Hole it goes in.
Do not Force the peg in. Sand or Rasp down
if it fits to tight in the hole.

This is another view of a plug securely installed.

Here you can make out how the 8 pegs are laid out.
4 on the ends, and 4 equally spaced on each side. Try
to match up the pegs on opposite sides as close as
you can. Slight warps in the lumber should not cause
any big problems. When you have all the Dowel Anchor pegs installed,
Just slip the 4 finished Rib assemblies onto the protruding Pegs. You could put small screws
through the pipes and into the pegs but I haven't fount that to be necessary. The cover will
hold them on anyway. My Cloche has easily withstood 65mph + winds already when closed.
Without latching or tying down the cover or screwing the frame to the Raised Bed . The Cloche
is attached to the Raised Bed with just the 3 Hinges that we will soon be installing.
Slip the Pipe Rib Assemblies on to the Pegs

The Ribs have been installed. It is now time to set the frame on the Raised Bed.
You might want to remove the Rib Pipes temporarily to facilitate moving the frame.
I have found that the pipes do not have to be fastened any further to the frame than
setting them over the pegs. That is why snug accurate fit is important. The soon to be attached
covering will also keep the pipes from pulling out.

Here we have attached the single 2 x 2 x 8 Ft
"Spine" to the Cloche Ribs at the top. I just set a screw
down through each pipe in the center of the small pipe, and down
into the spine. You Might enlist a friend to help you with this. Or
Just wire it up temporarily until all the screws are in. I fashioned
a little Jig to help hold the screws until they are set. Here you will also
notice how the Hinges are attached on the prevailing wind side. (North
for Winter in this case.

Here is the simple jig I fashioned out of a scrap block of wood.
I first drilled a hole the same size at the outside of the pipe. Then I punched a hole in the block to guide a Bit.
when I set the block astraddle the very center of the rib (very top) The block was then cut down the middle of the Pipe hole and one of the halves discarded. The jig sets on top of the pipe to guide a small bit down
through the pipe and into the Backbone piece. Then a screw is dropped
in and easily fastens the wooden Backbone to each Rib.The screw hole should be slightly smaller than the screw you are using. Use a practice piece to check that out. To small the screw will split the pipe. Not good.
To large, the pipe will separate from the center spine that you are screwing into.

A better view. Notice how the spine is centered through each Rib
and attached with a single 1-3/4 inch drywall screw. And yes, the front is slightly off center.
I will have to fix that some day.... That's what I get for "eye-balling" when I'm tired! This is where I
finished up for the day and went in for clean-up and Dinner. I finished up the next day. I was bushed!

This shows how the Cloche Frame sets on top of the Raised Bed Timbers.
Links to Article Sections
Copyright Robert Mader 2012
All rights Reserved
No comments:
Post a Comment